This guide will help you transform your space by teaching you how to properly install laminate flooring. With the right tools and a bit of patience, you can achieve a stunning result that will enhance the look of your home. This step-by-step process will also ensure durability and safety, as improper installation can lead to issues down the line. Get ready to probe your DIY project with confidence, as you learn the imperative techniques for installing laminate flooring like a pro.
Key Takeaways:
- Preparation: Ensure the subfloor is clean, dry, and level before installation for optimal results.
- Acclimation: Allow the laminate planks to acclimate in the room for at least 48 hours to prevent expansion or contraction after installation.
- Installation Technique: Use a proper locking mechanism during installation and leave a gap around the edges for expansion to achieve a professional finish.
Understanding Laminate Flooring
Before you investigate the installation process, it’s imperative to have a solid understanding of what laminate flooring truly is.
What is Laminate Flooring?
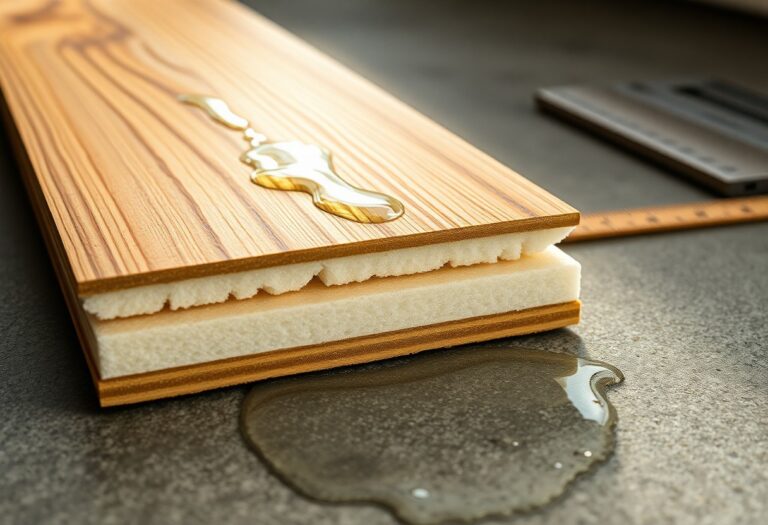
Now, laminate flooring is a multi-layer synthetic flooring product designed to mimic the appearance of wood, stone, or other natural materials. It consists of four primary layers: a backing layer providing stability, a core layer that offers durability and moisture resistance, an image layer that showcases the design of the flooring, and a top wear layer that protects against scratching and fading. This construction not only contributes to its visual appeal but also enhances its strength and longevity.
One significant advantage of laminate flooring is its ease of installation. The planks typically have a click-lock mechanism that allows for a floating installation method, meaning you can install them over most existing floors without the need for glue or nails. This ability to DIY can save you both time and money, allowing you to enjoy your new floors sooner. Additionally, laminate flooring is known for its affordability, making it a popular choice among homeowners looking for an attractive option that doesn’t break the bank.
Furthermore, laminate flooring is incredibly versatile. With countless designs and finishes available, you can easily find a style that complements your home décor, from classic oak to contemporary tile looks. This flexibility means you can create the aesthetic you desire without sacrificing performance or budget. Overall, laminate flooring combines the best of both worlds: the elegance of natural materials with the advantages of modern engineering.
Benefits of Choosing Laminate Flooring
Little do many homeowners realize, choosing laminate flooring comes with a multitude of benefits that enhance your living space. For one, laminate flooring is exceptionally durable. Its wear layer helps resist scratches, dents, and stains, making it an ideal choice for households with pets or young children. The resilience of laminate allows it to withstand the daily wear and tear of foot traffic, ensuring your floors remain visually appealing for years to come.
In addition to durability, laminate flooring is also easy to maintain. Regular sweeping or vacuuming, along with occasional damp mopping, is generally all it takes to keep your laminate floors clean. This low-maintenance requirement is perfect for busy lifestyles where time is precious. Moreover, many laminate products are designed with moisture resistance, making them suitable for installation in kitchens, bathrooms, and other high-humidity areas where traditional hardwood flooring might not fare as well.
Another significant benefit is the affordability of laminate flooring. Compared to solid hardwood or stone flooring, laminate provides a similar aesthetic at a fraction of the cost. This element of cost-effectiveness makes it possible for you to achieve your desired home design without overspending. The combination of great looks, easy maintenance, and economical value makes laminate an attractive choice for many homeowners.
What you may find even more reassuring is the extensive warranty options available for laminate flooring products. Many manufacturers offer warranties that can last up to 25 years, giving you peace of mind about your investment. This durability combined with affordability creates a strong case for laminate as a top contender in flooring choices.
Common Myths About Laminate Flooring
Clearly, there are many misconceptions surrounding laminate flooring that can deter you from considering it as a viable option for your home. One prevailing myth is that laminate is the same as vinyl flooring. In reality, while both are synthetic, laminate is constructed with a different process involving high-density fiberboard and a photographic layer, providing a unique look and feel. Understanding this distinction can make a significant difference in your flooring decisions.
Another common myth is that laminate flooring is prone to warping and damage, particularly in moisture-prone areas. While it’s true that water can harm laminate if left standing for prolonged periods, many modern laminate products come with built-in moisture barriers. Therefore, when installed and maintained correctly, laminate flooring can be suitable for kitchens and bathrooms. It is imperative to check the product specifications to ensure moisture resistance before installation.
Finally, some people believe that laminate flooring lacks warmth and character compared to hardwood. This is a misconception because modern laminate flooring options offer high-quality designs that closely mimic the appearance of natural wood grains. With advanced printing technology, you can select laminate flooring that resonates with your loved aesthetic, proving that laminate can indeed add charm to your home.
For instance, investing in high-quality laminate flooring allows you to enjoy the realistic look of timber without the associated costs and upkeep, which ensures that your flooring will remain a fresh, appealing feature in your home. By choosing the right laminate, you can overcome these myths and relish the style and benefits it provides.
Factors to Consider Before Installation
Even the best-laid plans can go awry if you overlook key elements before installing your laminate flooring. Taking the time to consider the various factors involved in the installation process can save you time, money, and headaches down the line. Here are several important points you should evaluate:
- Room Conditions and Environment
- Type and Quality of Laminate Material
- Underlayment Selection
- Tools and Supplies Needed
The considerations you make can play a significant role in the final appearance and durability of your new flooring.
Room Conditions and Environment
One of the first aspects you need to address when installing laminate flooring is the room conditions and environment. This includes assessing factors such as humidity, temperature, and the amount of foot traffic the area is expected to endure. Laminate flooring is composed of several layers, and excessive moisture can cause your flooring to warp or swell. Therefore, it’s necessary to check the humidity levels in your room. Ideally, you want to maintain a relative humidity level between 30% and 50% for the best performance of your laminate.
Moreover, temperature plays a significant role in the compatibility and longevity of laminate flooring. Extreme temperature fluctuations can lead to expansion and contraction in the flooring material. Consider measuring the ambient temperature in the room before installation. For optimal conditions, your flooring should acclimate at room temperature for at least 48 hours prior to installation. You can also utilize a thermometer to ensure that your space remains within the appropriate range for the type of laminate you have chosen.
Your flooring will be subject to the wear and tear of everyday life, so you must assess the anticipated foot traffic in your space. High-traffic areas may require more durable options with tougher wear layers. If you’re installing laminate flooring in a space with higher moisture levels, like bathrooms or basements, consider waterproof or water-resistant laminate options. The evaluation of these conditions prepares your space for a successful laminate flooring installation.
Type and Quality of Laminate Material
Consider the type and quality of the laminate material you are investing in before installation. The market is filled with various styles, thicknesses, and brands, and each has its own lifetime performance, aesthetics, and price point. High-quality laminate flooring typically has a higher density core and thicker wear layer, making it more resistant to scratches, dents, and fading. When browsing through options, ensure to assess the AC rating. An AC rating of 3 or above is often recommended for residential use in living areas, whereas a rating of 4 or higher can be suitable for heavy commercial applications.
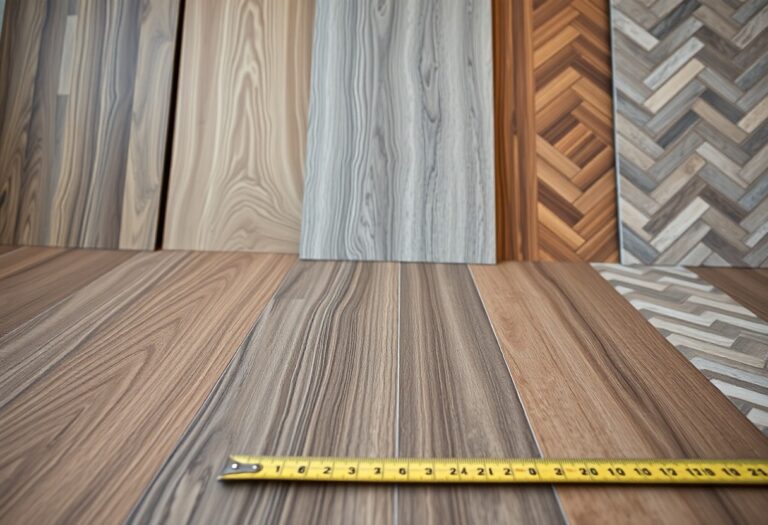
Additionally, the design and visual appeal of laminate flooring play a vital role in your overall satisfaction. Select styles that complement your existing decor and envision how the flooring color and texture will affect your space. Do you prefer more sleek and modern looks or warmer, more traditional styles? The choices are virtually endless, but examining options and understanding which styles resonate most with you is necessary for making an informed decision.
Fluctuations in price should also be considered when choosing laminate materials. While it’s tempting to go with the lowest-priced option, it might lead to costlier repairs or replacements in the long run. Additionally, factor in warranties provided by the manufacturers when evaluating the overall quality. A longer warranty can be an indicator of greater confidence from the manufacturer in the longevity of their product. The quality of the laminate you choose is fundamental to achieving a successful and lasting floor installation.
Another factor to consider concerning laminate material is its environmental impact. Many manufacturers now offer laminate flooring made from sustainable materials, which can be a great option if you’re eco-conscious. Ensure to look for certifications such as FSC (Forest Stewardship Council) or CARB (California Air Resources Board) compliance, which can indicate that the materials have been responsibly sourced and manufactured.
Underlayment Selection
With the right underlayment choice, you can significantly enhance the performance of your laminate flooring. This layer sits between the subfloor and your laminate planks, offering several necessary functions such as sound absorption, moisture protection, and even added cushioning for comfort underfoot. Choosing an underlayment that suits your specific installation scenario is indispensable. Make sure to assess your existing flooring situation; for example, if you’re installing laminate over a concrete slab, a vapor barrier underlayment can be necessary to prevent moisture from seeping upwards.
In addition to moisture control, consider the soundproofing qualities of your underlayment. Living in an apartment or a multi-story home means that noise levels from foot traffic can be an issue. Select underlayment specifically designed to dampen sound, which can create a more serene living environment. Additionally, some underlayments come with thermal insulation properties, making them an excellent choice for spaces prone to cold or drafts, providing a more enjoyable indoor climate.
Lastly, understanding the compatibility of your chosen underlayment with the laminate product you selected is vital for a successful experience. Some manufacturers have specific recommendations for what kind of underlayment works best with their flooring products. Adhering to these recommendations can ensure your warranty remains intact and that you experience optimal performance from your new floor.
Conditions in your installation area can also play a role in the type of underlayment you select. If your room experiences fluctuations in humidity, a higher caliber moisture barrier underlayment may be necessary to help protect your flooring.
Tools and Supplies Needed
Laminate flooring installation can be straightforward if you have the right tools and supplies on hand. It is imperative to gather items such as a circular saw, tapping block, and a pull bar to ensure your installation process goes smoothly. Additional items like spacers, a measuring tape, and a square can help precisely fit the flooring pieces into place. Moreover, a utility knife can be beneficial for cutting the underlayment and making adjustments during the installation.
Another key aspect is ensuring you have all the necessary safety equipment to protect yourself during the process. A pair of quality safety glasses will shield your eyes from any debris or dust created during the cutting process. Wearing gloves is also a wise choice, as you will be handling sharp tools and materials which can pose risks of injury. Ensure you have a dust mask readily available, particularly if your installation involves sanding or cutting materials that release fine particles into the air.
Finally, be prepared for cleanup. Having trash bags or a designated bin on-site will help keep the workspace organized and clutter-free. An efficient cleanup routine not only makes the process safer but can also speed up your installation time. Ensuring you have the right tools and accessories in place helps lay the foundation for a successful laminate flooring project.
Type of tools you will need can vary depending on the complexities of your installation project but always prioritize using high-quality tools from trusted brands to minimize safety risks and enhance efficiency.
Preparing the Installation Area
Clearing the Space
Your first step in preparing for your laminate flooring installation is to clear the space. This means removing all furniture, decor, and any other items from the room where you plan to lay the laminate planks. Take your time with this process; it’s necessary to create a clean slate so that you can work with ease and confidence. You might find it helpful to have a designated area to store your furniture temporarily, ensuring it remains safe from scratches or damage while you work.
On a practical note, be aware that some larger furniture pieces may require disassembly for easier transport. For instance, sofas often don’t fit through doorways easily, especially if you are blocked by tight corners or narrow hallways. Don’t hesitate to solicit help from family members or friends for lifting and moving bulky items. Also, don’t forget about small items such as rugs or lamps—these should also be removed to avoid any trip hazards.
It’s advisable to take a moment to clean the floor surface after removing your furniture. A vacuum or broom can help pick up any debris or dust. This cleaning will help you visualize any repairs or changes you need to make to your subfloor. A clean space also enhances your overall installation experience, making it easier to navigate them as you work.
Assessing and Preparing the Subfloor
On to the next step, it’s time to evaluate your subfloor. A successful installation begins with a solid foundation, so assessing your subfloor’s condition is necessary. Check for *levelness*, ensuring that no significant dips or peaks exist. If you find any irregularities, these should be addressed before laying down your laminate flooring. You can use a level tool to measure this accurately, as even minor imperfections can cause your new floors to warp or buckle over time.
Additionally, you should inspect for moisture issues. Wet or damp subfloors can lead to mold growth, which can compromise your laminate and your health. Use a moisture meter if you have one, or simply place a piece of plastic sheeting on the floor for several days. If condensation occurs beneath the plastic, that indicates moisture issues that require attention. In some cases, it may be wise to consult a professional if extensive moisture damage or repair is needed.
Once the assessment is complete, it’s necessary to prepare your subfloor for the laminate installation. Any necessary repairs should be made, such as filling in gaps or leveling high spots with a compound. Don’t overlook cleaning the subfloor thoroughly to ensure no dirt or particles remain, as these can interfere with the installation process and affect the longevity of your laminate flooring.
For instance, if you notice squeaky areas, it may be helpful to tighten screws or nails, or even add additional support to those areas to prevent movement in the future. Ensuring your subfloor is in good condition and ready for installation is a significant part of the overall project that will ensure the best outcome for your new flooring.
Acclimating Laminate Planks
Laminate flooring needs to acclimate to the environment of your home before it is installed. Unopened boxes of laminate can typically be left in the room where they will be laid for at least 48 hours. This time allows the planks to adjust to the temperature and humidity levels, minimizing the chances of expansion or contraction once installed. It’s important that you don’t skip this step, as improperly acclimated panels can lead to gaps or swelling along the seams after installation.
During this acclimation period, you should open the boxes and separate the planks slightly to allow air circulation. This is a prudent step that promotes even acclimation and helps to prevent any potential issues related to stale or trapped moisture within the boxes. If you’re dealing with particularly high or low humidity levels, it’s smart to allow for a longer acclimation window.
While the laminate is acclimating, take this time to plan your layout and familiarize yourself with the installation process. Sketching out where you want the planks to go can help you visualize your project better and avoid any hasty mistakes once installation begins.
Plus, proper acclimation can significantly improve your flooring experience in the long term. By allowing the laminate to adjust, you are taking steps to ensure a seamless installation and an aesthetically pleasing finished result. Proper preparation is key to achieving the best performance from your new flooring. Be patient and give your laminate the time it needs before installation. It will pay off in the end!
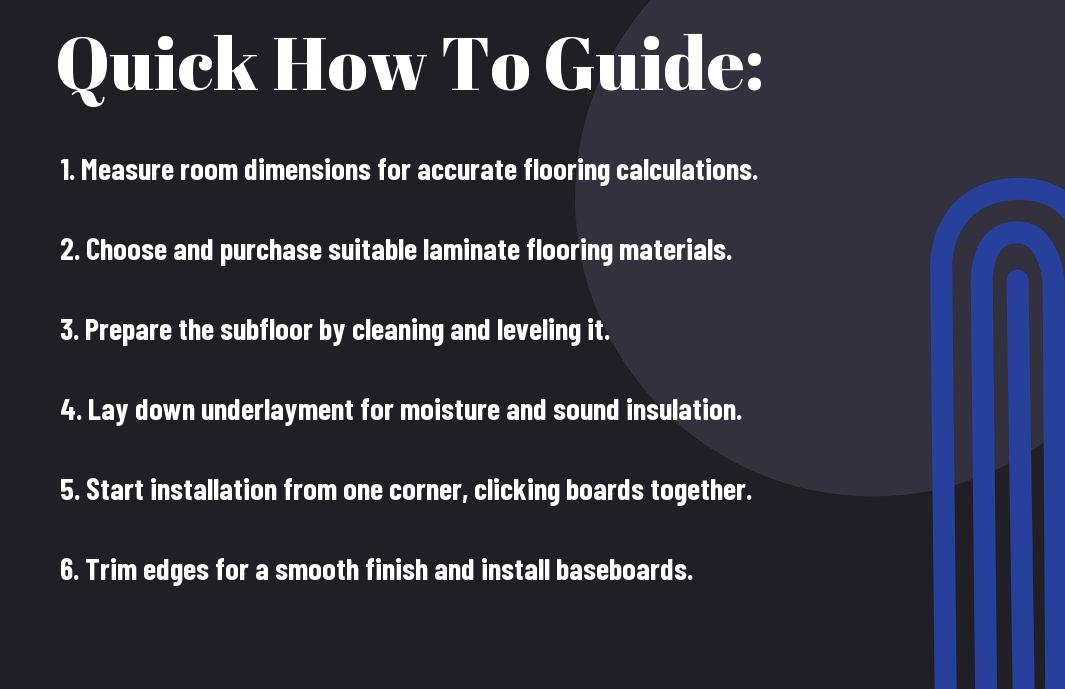
Step-By-Step Installation Process
For achieving a professional finish with your laminate flooring installation, it’s important to follow a systematic approach. This guide outlines an efficient process, broken down into manageable steps. The installation of laminate flooring involves careful planning and execution, ensuring durability, aesthetics, and easy maintenance.
| Steps | Details |
|---|---|
| Planning the Layout | Measure your space and determine the layout of the laminate flooring. |
| Installing the Underlayment | Prepare the subfloor and lay down the underlayment. |
| Starting the First Row | Ensure the first row is level and properly spaced. |
| Installing Subsequent Rows | Continue laying planks while ensuring stability. |
| Trimming and Fitting Around Obstacles | Carefully cut planks to fit around door frames and other fixtures. |
Planning the Layout
The success of your laminate flooring installation largely depends on the initial planning of the layout. Start by measuring the dimensions of the room where the flooring will be installed. This includes taking into account the length and width of your space, as well as noting any features that may affect the installation, such as doorways, vents, and electrical outlets. A detailed floor plan can help you visualize the placement of each plank and the necessary cuts that will need to be made.
When planning the layout, consider the orientation of the laminate planks. Installing them parallel to the longest wall in the room creates a sense of continuity, making the space appear larger. Additionally, think about how light enters the room; aligning the planks with the light source can enhance the overall aesthetic by minimizing visible seams and shadows. Drawing a simple diagram of your layout can help you make informed decisions on how to proceed.
Lastly, ensure you have calculated the number of planks needed for the job, accounting for waste and any unforeseen issues that may arise during installation. It’s wise to purchase an extra box or two of laminate flooring to cover any mistakes. Having a solid plan in place will streamline the installation process and set the stage for a successful outcome.
Installing the Underlayment
On the day of installation, you will first need to prepare your subfloor, which serves as a foundation for your laminate flooring. Clear the area of any debris and ensure the surface is clean and level. Any imperfections, such as bumps or dips, should be corrected to avoid problems during and after installation. Once the space is prepped, lay down your underlayment, which acts as a cushion between your flooring and the subfloor while also providing noise reduction and moisture protection.
It’s important to roll out the underlayment without any wrinkles and cut it to fit your specific room dimensions. Be sure to follow the manufacturer’s guidelines on how much overlap, if any, is required between sections. You can tape the seams for extra security, as this will help keep the underlayment in place throughout the installation process. Installing the underlayment correctly not only enhances the durability of the flooring but also ensures a more comfortable feel underfoot.
For instance, if you’re installing the laminate over a concrete subfloor, choose an underlayment with a moisture barrier. This added layer will protect the laminate from potential water damage, especially in areas prone to spills or humidity. An optimal installation of the underlayment lays the groundwork for a long-lasting and appealing finish.
Starting the First Row
You should now focus on starting the first row of laminate flooring. Begin by placing spacers against the wall to maintain an expansion gap, which is necessary for laminate flooring to accommodate natural fluctuations due to temperature and humidity. Next, lay the first plank down, ensuring that the tongue side is facing the wall. If your planks require glue or locking mechanisms, verify the manufacturer’s instructions to achieve a secure fit.
Assess the level of the first row, using a leveler or straight edge to ensure it is perfectly straight. If the wall is not straight, you might need to trim the first plank or use a warped one as a reference to maintain alignment as you move forward. A well-laid first row sets the tone for the rest of the installation, so take your time to get it right.
It is important to take time during this phase to avoid future complications. When satisfied with the positioning of the first row, proceed with the second piece and continue placing additional planks. You can employ a tapping block or mallet to snugly fit the pieces together without causing damage.
Installing Subsequent Rows
One of the next steps is continuing your installation by carefully laying down subsequent rows. Utilize the same expansion gap method as before by inserting spacers between the planks and the wall. This ensures that your flooring can expand and contract without buckling. When placing the next row, do not align the seams directly with the previous row. Staggering the seams creates a more aesthetically pleasing look and aids in stability.
As you work row by row, use a tapping block to secure each plank in its place, gently tapping the sides where the planks connect. Move methodically, measuring and cutting planks as necessary to fit the space. Keeping the overall layout in mind will help you avoid potential pitfalls such as misaligned planks or gaps, which can detract from the overall appearance.
Planning ahead can save you a lot of frustration during this step. By keeping extra planks and your cutting tools readily available, you will be able to address any unexpected challenges efficiently and keep your workflow uninterrupted.
Trimming and Fitting Around Obstacles
For handling obstacles such as door frames, pipes, or other fixtures, you’ll need to be prepared to make precise cuts. Start by marking the appropriate measurements on your laminate planks and using a jigsaw or handsaw to carefully trim them to fit around these imperfections. Be patient during this process—precision is vital to ensuring that everything fits snugly and looks professional.
As you trim, keep in mind the need for that same expansion gap around obstacles. A gap allows the laminate to shift and expand as temperature and humidity fluctuate, preventing warping or buckling. Once you have fit the pieces around any obstacles, check for a consistent appearance and make any necessary adjustments.
Installing planks around obstacles might seem daunting at first, but with the right tools and careful measurements, you can achieve a seamless look that enhances the overall design. A well-executed trim job can make your laminate flooring installations stand out and create a polished finish.
Installing the obstacles may require special attention to detail, so it’s wise to take your time. Rushing through this segment can lead to mistakes that diminish the overall aesthetic of your floor. By handling each cut patiently and with careful measurements, you will realize the beauty of your completed project.

Tips for a Successful Installation
Not every installation will go as planned, but with a few tips, you can enhance your chances for success. One of the most significant factors influencing the overall quality of your laminate flooring install is the preparation you do beforehand. Ensure that your tools are ready, the area is clean, and you have accounted for all necessary materials. Here are some tips to keep in mind:
- Maintain proper expansion gaps around walls and other fixtures.
- Ensure correct plank orientation for optimal aesthetics and functionality.
- Utilize the right installation techniques for a seamless fit.
- Practice cleaning during installation to prevent debris from causing damage.
After you’ve reviewed these imperative tips, you can look into the more intricate details of the installation process.
Maintaining Proper Expansion Gaps
For your laminate flooring to perform well over time, it’s imperative to maintain proper expansion gaps during installation. These gaps act as a buffer that allows for the natural expansion and contraction of the planks as they react to temperature changes and humidity levels. A good rule of thumb is to leave a gap of about ¼ inch around the perimeter of the room, which includes walls, door frames, and any other fixtures. This allowance is necessary to prevent buckling or warping of the boards.
As you progress with your installation, be sure to check these gaps as you lay the planks. If you notice they’re getting too narrow due to shifting or misalignment, you may need to adjust the planks. This minor adjustment can save you a significant amount of trouble down the road. Keeping these gaps consistent and wide enough can extend the life of your flooring and maintain its integrity.
Furthermore, the expansion gaps should not be filled with caulk or covered with baseboards right away. It’s best practice to allow the flooring to settle before sealing the edges. By carefully adhering to these guidelines, you ensure that your laminate flooring serves you well through varying seasonal changes and conditions.
Ensuring Correct Plank Orientation
While installing your laminate flooring, the orientation of the planks is not just about aesthetics—it affects the visual flow and stability of the entire floor. Typically, you should lay the planks in the same direction as the longest wall in the room. This approach creates a cohesive look that can enhance the sense of space within your area. Additionally, because light tends to enhance floor patterns, laying the planks parallel to the light source can make the room feel warmer and more inviting.
Correct plank orientation also impacts the overall performance of your new floor. When planks are aligned properly, they distribute weight more evenly, which minimizes wear over time. Misalignment may lead to uneven expansion or even warping, particularly in environments prone to humidity, like kitchens and bathrooms. By following this guideline, you’re taking important steps to ensure that your floor behaves as it should in various conditions.
Successful installation is no accident; it requires careful planning, proper execution of each step, and a keen eye for detail. Ensure that your entire installation process considers the orientation of your planks by regularly checking that they are positioned correctly before securing them in place.
Using the Right Installation Techniques
Installation methods can significantly impact the final outcome of your laminate flooring project. It’s imperative that you adopt the right installation techniques from the start. For most laminate flooring, a floating floor installation is the most common method, as it allows for the natural expansion and contraction of the boards without permanently adhering them to the subfloor. You’ll start by laying underlayment, which aids both moisture protection and sound absorption.
As you lay each plank, ensure they fit snugly together with the locking mechanism facing the right way. Use a tapping block to carefully connect them without causing damage to the edges. This technique will help avoid gaps and keep your floor level and smooth. You should also stagger the seams of the planks by at least 12 inches; this adds both to the strength of the assembly and the overall look of your flooring.
Right from the first plank to the last, adopting effective installation techniques can mean the difference between a floor that looks great and lasts for years versus one that shows wear and tear quickly. Each step, from underlayment to the final plank, is imperative to a successful installation.
Cleaning During Installation
Even though it may appear counterintuitive during a flooring project, consistent cleaning during installation can have lasting benefits. Keeping your workspace free from debris reduces the risk of scratching or damaging the newly installed planks. Moreover, preventing dust accumulation is key; it can interfere with the adhesive quality in certain types of installations and lead to an unsightly finish if not addressed promptly.
As you install each plank, take the time to routinely clean both the floor and the planks themselves. This doesn’t just mean sweeping; it involves using a damp mop or microfiber cloth to pick up fine particles that a broom might leave behind, especially in high-traffic areas. Pay particular attention to the edges of the planks as dirt can easily gather there, leading to an uneven finish. Ensuring that the surface is clean before placing the next plank down not only protects your work but also helps with the alignment and locking mechanism.
Plank alignment matters, and a clean surface will enhance the adhesion of the planks. By maintaining cleanliness throughout the installation process, you’ll likely find a smoother, more successful outcome.

Common Mistakes to Avoid
Skipping Acclimation
Acclimation is vital for ensuring that your laminate flooring performs well over time. In many cases, homeowners overlook this important step when installing new flooring. When you bring your laminate planks home, they need time to adjust to the ambient temperature and humidity of your home. Failure to allow your laminate to acclimate can lead to warping and gapping, which can ruin the aesthetic appeal and functionality of your floor. It is advisable to leave the planks in the room they will be installed in for at least 48 hours, ensuring they are laid flat and are not subjected to direct sunlight or moisture prior to installation.
During the acclimation process, keep the room at a consistent temperature, ideally between 60°F and 80°F. High humidity can affect the expansion and contraction of the planks, while overly dry conditions can cause cracks and damage. Give your laminate flooring time to adjust to these environmental factors before installation to achieve a flawless finish. By doing this, you set the foundation for a long-lasting flooring solution.
Additionally, each climate and season can affect how laminate performs once installed. Therefore, if you are installing during a particularly humid or dry season, it is even more important to pay special attention to the acclimation process. You want the laminate to settle and become ‘one’ with its surroundings, minimizing the risk of future complications and ensuring that your installation remains smooth and stable.
Ignoring Manufacturer Instructions
Manufacturer instructions provide valuable information tailored specifically for the product you are using. Each laminate flooring brand has unique requirements regarding installation methods and acclimation times. By ignoring these guidelines, you may inadvertently void the warranty or create problems that compromise the longevity and performance of your floor. Always take the time to thoroughly read and understand the manufacturer’s instructions before undertaking your installation project.
Look for details on recommended underlayments, specific tools needed, and any unique installation techniques that might be required for your laminate. These guidelines can prevent issues like improper locking mechanisms or inadequate moisture protection. For example, some manufacturers may recommend a specific type of underlayment that performs better with their product, while others might have specific fastening methods that you should adhere to closely.
To genuinely reap the benefits of your investment, consult these instructions not just at the onset of your project but continually during the installation process. If you ever find yourself unsure about any aspect or step, do not hesitate to reach out to the manufacturer’s customer service for clarification. This can save you time and trouble in the long run.
Improperly Measuring and Cutting Planks
Cutting your laminate flooring requires precision and attention to detail. If you rush the measurement process or don’t measure twice, you might end up with planks that are either too short or too long. Such mistakes can lead to uneven seams or large gaps, both of which detract from the floor’s appearance and can even be tripping hazards. Always take the time to measure the area thoroughly, using a straight edge and level to ensure your lines are accurate. Keep in mind that walls aren’t always perfectly straight, so take measurements at multiple points.
Once you have your measurements down, cutting the planks requires the right tools—whether using a saw or laminate cutter. Ensure that you are also following safety recommendations to avoid accidents during this critical portion of your project. Clean and precise cuts will ensure that the planks fit snugly into place, resulting in a more professional appearance. Avoid using damage-prone cutting tools that can make your work less effective.
Common oversights in measuring can also occur when planning layouts—like disregarding expansion gaps needed along walls or obstacles. Always plan for these gaps so that your floor can expand and contract without compromising its integrity. When you take your time with both the measuring and cutting steps, you ultimately leave yourself a much wider margin for success when it comes to installing your laminate flooring.
Neglecting Underlayment
Now, let’s talk about the important role of underlayment when installing laminate flooring. Underlayment serves several functions—it provides cushioning, sound absorption, moisture protection, and helps with temperature regulation. Skipping this crucial layer can lead to a floor that feels hollow, noise pollution, and faster wear and tear over time. Make sure to choose an underlayment that is compatible with your specific laminate type.
Additionally, the lack of proper underlayment can contribute to thermal discomfort, especially in areas with extreme weather. If you live in a hot climate, the underlayment can help keep your flooring cooler, while in colder climates, it provides insulation against cold surfaces. Don’t overlook how underlayment can promote a more comfortable living environment—both in terms of temperature and noise.
Planks can compress and shift over time without adequate support underneath them, leading to buckling or separating from their seams. Always invest in good-quality underlayment that meets your specific needs for the space you are installing the laminate. This step can significantly enhance the performance and longevity of your flooring while also improving its overall appearance.
Maintenance and Care After Installation
Keep your laminate flooring looking its best with the right maintenance routine. Regular cleaning not only enhances the appearance of your floors but also helps in prolonging their lifespan. One of the simplest cleaning techniques you can adopt is to use a soft-bristle broom or a vacuum cleaner designed for hard floors to remove dirt, dust, and debris. This should be done on a weekly basis to prevent the accumulation of grit that can scratch and damage the surface of your laminate. When cleaning, avoid using a wet mop, as excess moisture can seep into the seams and lead to warping or swelling over time. Instead, utilize a damp cloth or a mop specifically designed for laminate flooring to keep things clean and safe.
Some stains may require specific cleaning solutions. For example, a mixture of vinegar and water can be effective for removing sticky residues or gummy spots, while a specialized laminate cleaner can be useful for tougher marks. Always test a small, inconspicuous area first to ensure that the product does not cause any discoloration or damage. To maintain the shine and luster of your flooring, consider using a floor polish recommended for laminate, but avoid using wax or oil-based products. These can lead to a slippery surface and can cause more harm than good.
In addition to regular cleaning, you should also establish a habit of addressing spills immediately. Wipe up water, juice, or other liquids as quickly as possible to prevent them from sitting on the surface. In doing so, you are not only protecting the laminate but also helping to prevent potential mold or mildew growth. By following these simple yet effective cleaning techniques, you will keep your laminate floors looking beautiful and help ensure their durability.
Preventative Measures for Longevity
After installing your laminate flooring, taking preventative measures is necessary for maintaining its appearance and integrity over time. One significant step is to place protective pads on the legs of your furniture. This simple addition can prevent scratches and dents that are often caused by moving heavy items across the floor. Ensure that you regularly check these pads and replace them as needed, especially if they begin to wear down or lose their effectiveness.
It is also important to control the humidity levels in your home, as excessive moisture can lead to structural issues with laminate flooring. Utilize a dehumidifier during particularly humid months, and ensure proper ventilation in areas prone to moisture, such as kitchens and bathrooms. This will help mitigate the risk of warping or swelling in your flooring, which is something you definitely want to avoid for the longevity of your investment.
Additionally, use area rugs in high-traffic zones to provide extra protection from scratches and scuffs. These rugs can absorb some of the wear and tear from foot traffic and are easy to clean. Taking these preventative measures can significantly enhance the lifespan of your laminate flooring, letting you enjoy its beauty and durability without worry.
Installation of laminate flooring creates a sturdy foundation, but neglecting preventative measures can lead to lasting issues. By implementing simple actions like using furniture pads, controlling humidity, and strategically placing area rugs, your floors will stay vibrant and intact for years to come.
Addressing Damages and Repairs
The inevitability of wear and tear does not mean that you have to accept a damaged floor. Being proactive in addressing damages and repairs is key to maintaining the beauty and function of your laminate flooring. If you notice scratches or scuff marks, you can often buff them out using a laminate flooring cleaner or a specialized repair kit designed for minor surface damage. For deeper scratches or gouges, some manufacturers offer color-matched wax pencils or repair kits that can blend seamlessly into your flooring.
In the event that a plank becomes severely damaged, you can replace it without having to redo your entire floor. Most laminate floors are designed with a click-lock or snap-together installation, which makes it relatively simple to lift out the affected plank without disturbing the surrounding ones. Follow the manufacturer’s instructions for replacing planks, ensuring that you match the style and finish so that the new plank blends well with the existing flooring.
You should also keep an eye out for other common issues, such as buckling or warping. These problems might require more thorough inspections of the underlying surface, often indicating that moisture levels need to be controlled more effectively. Engaging a professional may be necessary in situations where extensive repairs are required, ensuring that your flooring stays in excellent shape.
Damages to laminate flooring can be managed effectively with prompt action. By utilizing repair kits and knowing how to replace individual planks, you can maintain a pristine appearance even after minor accidents occur. Stay vigilant for any signs of wear; prompt attention will pay off in the long run.
Summing up
Considering all points, successfully installing laminate flooring involves a systematic approach, ensuring that your efforts yield a beautiful and durable surface for your home. You will begin by preparing your workspace, which includes clearing the area and ensuring the subfloor is clean, dry, and level. This foundational step is significant, as it dictates how well your laminate will settle and perform over time. Once everything is prepped, acclimating the laminate planks is next, allowing them to adapt to your living environment helps prevent issues such as warping or gapping after installation.
After acclimation, you will proceed with laying down an underlayment, which acts as a moisture barrier and provides additional cushioning. Positioning your planks correctly is imperative, as the layout can significantly influence the final aesthetic and functionality of your floor. Following the step-by-step process of installation—cutting the planks as required, ensuring proper clicks, and maintaining expansion gaps along the walls—will help you avoid pitfalls that could compromise the integrity of your work. It’s imperative to take your time during this phase, as meticulous attention will pay off in the long run.
Finally, after you’ve laid the entire floor, completing the installation with appropriate trim and transitions ensures a polished look that blends seamlessly with your space. You can enhance the overall appearance of your installation by cleaning up thoroughly and taking time to address any initial adjustments or issues that arise. With careful planning and execution, you can enjoy the satisfaction of having installed laminate flooring that not only meets your aesthetic preferences but also performs well for years to come. The skills you acquire through this process will serve you well, allowing you to tackle future DIY projects with greater confidence and expertise.