This guide will empower you to take on the satisfying project of laying vinyl flooring in your home. With the right tools and a bit of patience, you can transform your space with ease. Follow these step-by-step instructions to ensure a successful installation from start to finish. You’ll learn valuable tips and techniques that not only save you money but also enhance your skills as a DIY enthusiast. Let’s look into the details and get your floors looking incredible!
Key Takeaways:
- Preparation: Begin with proper subfloor evaluation and necessary repairs to ensure a smooth installation surface.
- Tools & Materials: Gather all vital tools, including a utility knife, measuring tape, and adhesive, to facilitate a seamless installation process.
- Installation Techniques: Follow the recommended laying patterns and adhere to specific instructions for cutting and fitting vinyl planks or tiles to achieve a professional finish.
Understanding Vinyl Flooring
With a growing number of homeowners turning to vinyl flooring for their renovation needs, it’s necessary to grasp its various aspects. This versatile product offers a balance of aesthetic appeal and practicality, making it a popular choice for different spaces in your home. As you explore your options, you’ll discover that vinyl flooring comes in several formats, each suited for specific applications and lifestyles. Knowing the types available will help you make an informed decision that aligns with your style and functional requirements.
Types of Vinyl Flooring
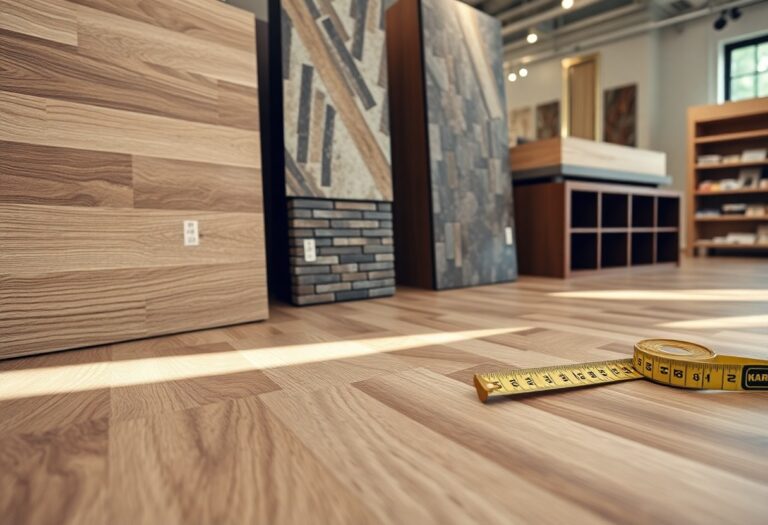
A plethora of options exists when it comes to types of vinyl flooring, and understanding these can support your DIY installation journey. The first type is the traditional sheet vinyl, which comes in large rolls and can be cut to fit your specific room dimensions. This option is seamless, meaning it minimizes the chances of water seeping through joints, making it a good choice for bathrooms and kitchens. Another type is luxury vinyl tile (LVT), which mimics the appearance of natural materials such as wood and stone. You can install LVT as individual tiles or planks, allowing for diverse patterns and design flexibility. Lastly, there is vinyl plank flooring, which shares characteristics and appearance with LVT but is usually thicker, providing added durability and comfort underfoot.
| Type | Description |
|---|---|
| Sheet Vinyl | Seamless rolls that minimize water penetration. |
| Luxury Vinyl Tile (LVT) | Individual tiles/planks emulating natural materials. |
| Vinyl Plank Flooring | Thicker planks for added durability and comfort. |
| Click-Lock Vinyl | Easy installation with interlocking edges. |
| Vinyl Sheets | Affordably priced, suitable for various residential uses. |
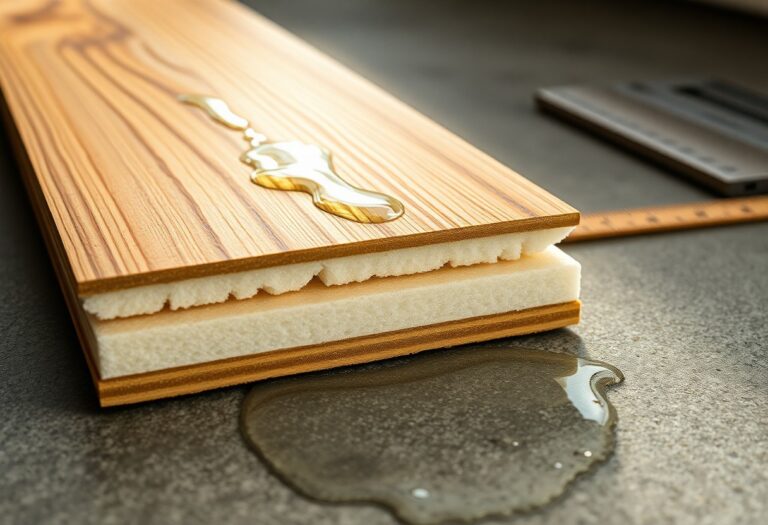
Key features of vinyl flooring have made it a sought-after option among homeowners and renters alike. As you investigate further, you will notice how vinyl seamlessly combines aesthetics with practicality, ultimately enhancing your living space while providing functionality. One of vinyl’s standout traits is its resistance to moisture, which makes it ideal for areas where water exposure is frequent. Additionally, the ability of vinyl flooring to withstand foot traffic without significant wear is another reason for its popularity, making it an excellent choice for households with children and pets.
Key Features
Vinyl flooring stands out for its affordability, durability, and ease of maintenance. When choosing the ideal flooring, consider these key features that truly define vinyl’s value in your home:
- Water Resistance – Perfect for high-moisture areas like kitchens and bathrooms.
- Durability – Resistant to scratches and dents, ideal for high foot traffic.
- Easy Installation – Designed for DIY enthusiasts, allowing for straightforward installation.
- Comfortable Underfoot – Provides cushioning that can help reduce fatigue.
- Variety of Styles – Available in numerous colors and designs, mimicking hardwood and stone.
This flooring type not only balances aesthetics and function but also accommodates various budgets and styles. Ensuring that you find the right option for your home relies on a keen understanding of these attributes and their implications for your lifestyle. As you navigate through the available choices, you’ll soon discover how these features enhance your living environment.
Vinyl’s versatility also means it’s suitable for a broad spectrum of areas within your home, showcasing its affordability, durability, and water-resistant properties. The unique combinations of these aspects allow you to confidently choose vinyl flooring that meets your expectations for beauty and practicality. When you’re ready to install, you’ll find that many products come with clear instructions, facilitating the DIY approach.
- Easy to Clean – Requires minimal upkeep, just dry mopping or damp cleaning.
- Sound Absorption – Helps to reduce noise levels in your home.
- Hypoallergenic – Resistant to mold and mildew, making it safe for families.
- Strong Wear Layer – Extends the life of the flooring and maintains its appearance.
- Affordability – An economical alternative to hardwood and tile.
This extensive array of features makes vinyl flooring a practical investment for your home, creating a livable space that reflects your personal style and meets your functional needs. As you plan for your installation, consider how these benefits align with your goals for your living area.
Factors to Consider Before Installation
For a successful DIY installation of your new vinyl flooring, it is crucial to take into account several key factors that can affect the overall outcome of the project. Proper planning can help you avoid common pitfalls and ensure that your vinyl flooring looks perfect and lasts for years. Here are some factors you should consider before stepping into the installation process:
- Room Type
- Subfloor Conditions
- Environmental Conditions
After considering these factors, you’ll be better equipped to handle your vinyl flooring installation with confidence.
Room Type
For each space in your home, the type of flooring you choose should cater to its specific needs. When dicking out your vinyl flooring, take into account the room’s primary usage. For instance, if you are installing vinyl flooring in high-traffic areas like the hallway or living room, you might want to select a thicker, more durable option that can withstand wear and tear over time. Conversely, for lesser-used spaces such as a guest bedroom or home office, you may opt for a lighter option that still looks great but does not require the same level of durability.
In areas with a high likelihood of spills or moisture, such as kitchens and bathrooms, choosing a water-resistant vinyl flooring can save you from potential headaches down the road. This type of flooring is designed to handle moisture, preventing warping or discoloration. You might also consider textured vinyl options in these spaces for added grip and safety, especially in areas where slip hazards may be a concern.
Furthermore, consider the overall design aesthetic of your home. Vinyl flooring comes in a wide variety of colors and styles, enabling you to create a harmonious look that complements your existing decor. Whether you’re aiming for a modern, minimalist vibe or a warm, traditional atmosphere, there’s a vinyl flooring option out there that fits your vision. Choose wisely, as the right flooring can enhance your space and influence the mood of each room.
Subfloor Conditions
Subfloor conditions play a significant role in how smoothly your installation will proceed. Subfloor refers to the structure beneath your finished flooring, acting as a foundation. Ideally, your subfloor should be clean, dry, and even to provide a solid base for the vinyl. If your subfloor is uneven or damaged, it may lead to installation challenges and compromise the lifespan of your vinyl flooring.
Before starting the installation process, examine your subfloor for any loose boards, cracks, or moisture issues. If you find any problems, repairs should be made prior to laying your vinyl flooring. Ensure that the surface is free of debris and that all nails and staples are flush with the surface to prevent any unwanted bumps or uneven spots in your new floor. You may also want to use an underlayment for added cushion and insulation if your subfloor is particularly rough, improving both the comfort and durability of your flooring.
The more thorough you are in assessing your subfloor conditions, the better your vinyl flooring installation will be. Skipping this step can result in visible imperfections that impact your floor’s appearance and function. By taking the time to prepare your subfloor properly, you can help ensure that your new vinyl flooring maintains its beauty and performance over time.
The quality and condition of your subfloor are transformative factors in the long-term success of your vinyl flooring. Inadequate prep work can lead to unsightly issues down the line, including buckling, cracking, or even mold growth in extreme cases. Testing the moisture levels of your subfloor through a simple moisture meter can identify potentially problematic areas. Ensuring that your subfloor meets the requirements laid out by vinyl flooring manufacturers will protect your investment.
Environmental Conditions
If you’re planning to install vinyl flooring, being aware of the environmental conditions in your home is vital to achieving the best results. Vinyl flooring can expand and contract with temperature fluctuations, so it’s crucial to maintain a stable environment. Ideally, your home’s temperature should be between 65°F and 85°F during the installation process. Extreme temperatures can affect the adhesive used and the flooring itself, leading to problems after installation.
Humidity is another environmental factor that should not be overlooked. Vinyl flooring performs best in environments with moderate humidity levels. High humidity can cause the flooring to swell, whereas extremely low humidity can lead to shrinkage. If you have control over your indoor climate, using a dehumidifier or humidifier can help you maintain the optimal conditions during both installation and the subsequent period.
Additionally, consider the exposure to natural elements like sunlight. Prolonged direct sunlight can fade your flooring over time, so positioning area rugs in sun-drenched spots can protect your floors. Employing window treatments can also mitigate sun exposure, ensuring your vinyl flooring retains its vibrancy and integrity. By understanding your home’s environmental conditions, you’re setting up your vinyl flooring for lasting success.
Conditions beyond your immediate control can still impact your vinyl flooring. For example, significant swings in temperature, such as those that occur during seasonal changes, can cause the flooring material to expand and contract. If you live in an area with extreme weather, be mindful about your installation timeline and how you maintain indoor temperature and humidity. Ensuring that your space remains as consistent as possible will help safeguard against environmental threats to your flooring.
Preparation for Installation
Unlike many other flooring options, vinyl flooring can be a highly rewarding project when approached with a proper preparation phase. Before you begin the installation process, it’s crucial to understand the necessary tools and materials, as well as how to accurately measure the space where your new flooring will reside. Adequate preparation not only makes the installation easier but can also significantly impact the longevity and look of your finished floor. Let’s research into what you need to get started.
Tools Required
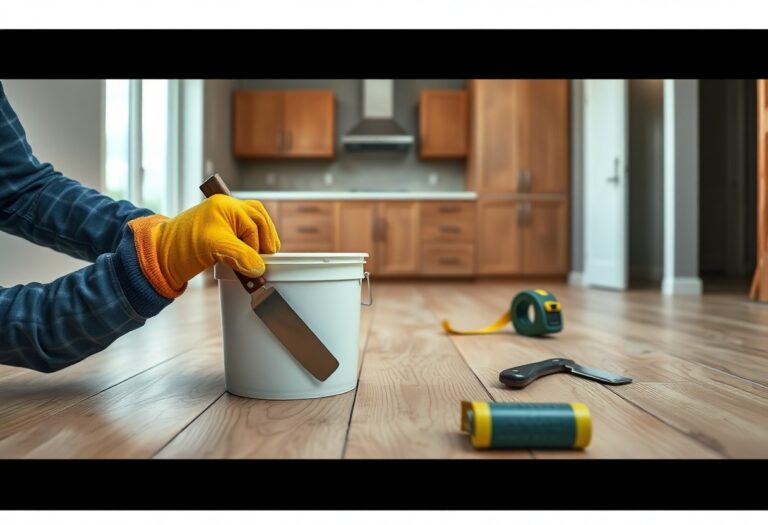
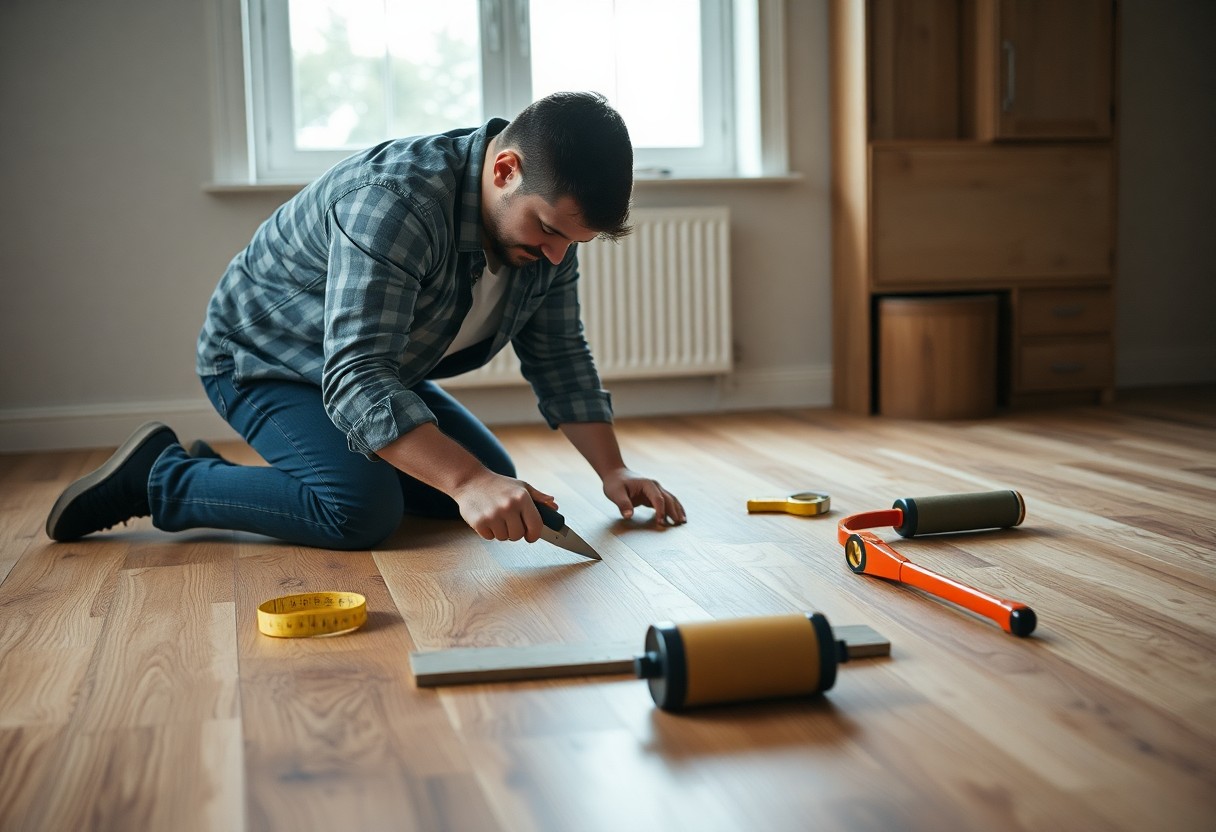
Any flooring installation requires a specific set of tools, and vinyl flooring is no exception. To ensure your installation goes smoothly, you’ll primarily need a utility knife for cutting the vinyl sheets or planks to the appropriate size. A straight edge or ruler will help you make clean, straight cuts, while a measuring tape is crucial for getting accurate measurements of your space. Additionally, you may want to have a pulling bar and a tapping block on hand for interlocking vinyl planks, as these tools will aid in fitting the pieces snugly together.
Furthermore, having a mallet can be beneficial when it comes to getting those seams just right, particularly if you are laying interlocking planks. Depending on the type of underlayment you choose, you might also need a flooring roller to ensure everything is smooth and level after installation. Safety goggles and protective gloves should also be a part of your toolkit to protect yourself while working with sharp tools.
Lastly, being prepared with basic cleaning tools can be just as important. A vacuum or broom for clearing the area of dust and debris will help ensure that your flooring is laid on a clean and even surface. With the right tools at your disposal, you can increase your efficiency and improve the quality of your final flooring installation.
Materials Needed
An crucial part of the preparation process is gathering all the materials you’ll need for your vinyl flooring project. Start with the vinyl flooring itself, which can come in sheets, tiles, or planks, depending on your preference and the area you’re covering. Choose a style that fits your home decor while also considering durability and ease of maintenance. Additionally, you will need an appropriate underlayment, which serves to provide cushioning and moisture barrier protection, making it vital for achieving a successful installation.
To adhere your vinyl flooring, you’ll require adhesive if you’re using sheet vinyl or glue-down tiles. Be sure to select a high-quality adhesive recommended for vinyl flooring. For floating vinyl planks, ensure you have the necessary spacers for expansion, as this type of flooring needs to adapt to humidity and temperature changes over time. Don’t forget to have a primer on hand if your subfloor needs it, as this can enhance the bond of the adhesive.
Finally, having a range of finishing materials can ensure your project looks professional. This can include transition strips for doorways, quarter rounds, and baseboards to cover gaps at the edges of the flooring, helping to provide a clean, polished look. Understanding these material needs allows you to source everything ahead of time, reducing interruptions during your installation.
Understanding how much flooring material you will need is fundamental in your preparation process. Before making any purchases, take the time to measure your space correctly to avoid any pitfalls during installation. Overbuying or underestimating can lead to increased costs or delays.
Measuring the Space
Any successful flooring installation starts with precise measurements of the area. Begin by measuring the length and width of the room in which you plan to install the vinyl flooring. To get the total square footage, you can use the formula: length multiplied by width. Make sure to measure at the longest points, particularly in irregularly shaped rooms where width can vary. Don’t forget to account for nooks, closets, or other features that will require individual cuts.
Once you have the square footage, it’s wise to add an additional 10% to your total estimate to cover any potential mistakes, miscuts, or future repairs. This buffer will ensure that you have enough material on hand to complete the job without the need to make additional purchases. Measure twice to ensure your calculations are accurate; this will save you time and frustration later on.
Plus, if you have an area that needs to be cleared before measuring, be sure to factor that in as well. Furniture can obstruct your measurements, so have a plan for moving everything out of the way. Taking the time to get your measurements right now will pay off in the long run, providing a seamless and visually appealing flooring installation.
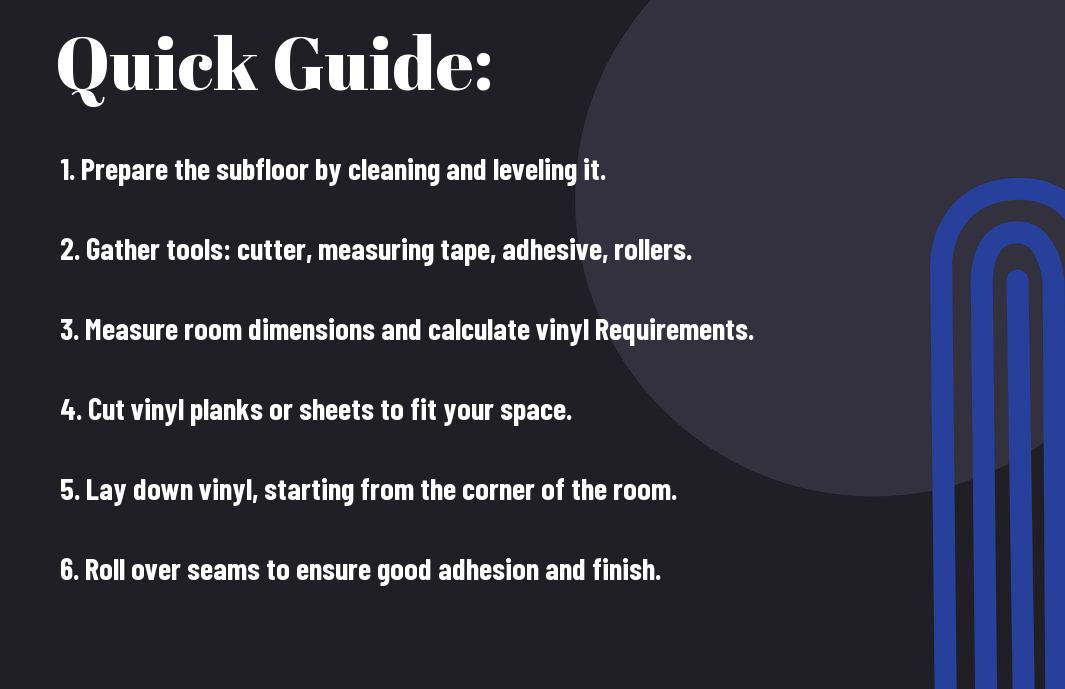
Step-by-Step Installation Process
Not every flooring project is created equal. Whether you’re tackling the renovation yourself or hiring someone, understanding each step can save you time and ensure a polished final look. Below, there’s an organized table that breaks down the must-follow steps you will encounter during the vinyl flooring installation process.
| Step | Description |
| 1 | Removing Old Flooring |
| 2 | Preparing the Subfloor |
| 3 | Laying the Underlayment |
| 4 | Installing Vinyl Flooring |
| 5 | Finishing Touches |
Removing Old Flooring
Clearly, removing your old flooring is the first vital step before laying down the new vinyl. Begin by clearing the room of any furniture and appliances, and ensure you are equipped with safety gear such as gloves and, if necessary, a dust mask. If you have carpet, vinyl, or tile to remove, use appropriate tools like a utility knife for carpet, a pry bar for tiles, or a scraper for glue. For visitors who might encounter debris, it is wisely advised to run a vacuum over the space to collect any stray materials. This creates a safer working environment.
In many cases, it is important to fully remove any adhesive left behind after the old flooring is gone. Failure to do so might compromise the integrity of your new flooring. Sometimes you may find that your old floor is glued down, particularly with vinyl tiles. Be prepared for a labor-intensive task. A floor scraper can help make this job less daunting but may still require a good amount of elbow grease. Always check that you’ve thoroughly cleaned the surface.
Finally, inspect the underlying subfloor for any signs of damage like rot, water damage, or mold. If you notice issues, it’s crucial to address them before moving forward as these problems can lead to significant ramifications for your new flooring. Fixable issues might involve replacing sections of the subfloor or applying sealants if moisture is present. Ensuring your foundation is sound paves the way for a successful install.
Preparing the Subfloor
With the old flooring out of the way, the next phase involves preparing the subfloor for your new vinyl. Start by ensuring the surface is clean, dry, and free of any residue. Use a floor scrubber or vacuum to remove dust and debris. This preparation is vital since any leftover particles might create unevenness during the installation process, leading to an awkward finish. Lay down a moisture barrier to protect your new flooring against potential moisture damage that could arise from the subfloor.
After cleaning, it’s time to check for any imperfections. Uneven surfaces can cause the vinyl to buckle or warp, so it is your job to ensure the subfloor is flat. You might need to sand down high spots or fill in low ones with a concrete patching compound. Allow everything to dry fully and check it with a level to confirm that you have achieved a uniform surface.
Following this, familiarize yourself with the type of underlayment recommended for your chosen vinyl flooring. Different brands may have specific needs, and understanding these can avoid installation issues down the line. A suitable underlayment can also aid in noise reduction and improve the overall comfort of your flooring.
Another consideration is that some vinyl products have an attached underlayment, which can save you a step in the preparation process. Review the specifications carefully to ensure you are following the manufacturer’s guidelines.
Laying the Underlayment
If you opted to install a separate underlayment, this step can significantly enhance the longevity and comfort of your vinyl flooring. Lay the underlayment in the direction opposite to the vinyl planks or tiles. This not only helps with stability but also reduces the chance of moisture build-up. Ensure seams overlap by at least six inches and tape them down to prevent shifting. Use a utility knife for precise cuts along the edges. Proper installation of the underlayment ensures an even surface for your vinyl and can prevent future problems.
Once you’ve laid the underlayment, be sure to check for any wrinkles or bubbles, as these can affect the overall look of your flooring. It can be beneficial to walk over it to flatten any potential gaps. The smoother this layer is, the more successful your installation will be. Small imperfections from the underlayment can amplify once the vinyl is laid, leading to an unsatisfactory finish.
When the underlayment is installed, take a moment to examine the entire layout to ensure it meets your vision. Laying it out with the right amount of care sets the stage for a flawless finish for your vinyl flooring installation. You can ensure durability and comfort for years to come within your strategy.
Installing Vinyl Flooring
Little do some know, but the installation process of the vinyl flooring itself can be quite straightforward if done correctly. Position the first board or tile in the corner of the room, making sure that it’s placed squarely. Use spacers to allow for expansion and contraction—this helps prevent gaps from appearing later on. From here, you can snap or glue your vinyl pieces together, depending on the method of installation you’ve chosen. Continue laying the planks or tiles row by row, checking the alignment at each step to make sure everything fits snugly.
When you reach the opposite end of the room, you may need to cut the last pieces to fit. Measure accurately and use a utility knife or a specialized vinyl cutter for clean, precise lines. Taking your time with this cutting process will yield the best results; hasty cuts could lead to fitting issues that will be visible after installation. As you continue, ensure that you maintain the established pattern to avoid any mismatched seams.
Once all pieces are laid, take a step back and admire your hard work. Troubleshooting any inconsistencies on the fly will ensure a polished presentation. It’s wise to give the flooring a gentle press down to secure any loose areas, which can further improve the longevity and performance of the flooring.
Flooring can be easily adjusted during the installation period. If you notice any pieces not fitting quite right, it’s always better to make modifications during the installation rather than regretting a mistake later on.
Finishing Touches
Process your way through the last stage, which is critical to achieving a professional finish. Begin by removing spacers from the edges of your newly laid vinyl flooring. It’s best to leave a slight gap—generally about 1/4 inch—around the room’s perimeter to account for expansion. Next, you will want to install baseboards or trim to cover these spaces, giving an elegant finished look to your flooring. Choose styles that match your overall decor for the best aesthetic result.
For further protection and to enhance the appearance, consider applying a flooring sealant. This depends on the type of vinyl you’ve chosen, so check the manufacturer’s recommendation. A sealant can help guard your flooring against scratches and spills, prolonging its life and maintaining its beauty. You should also conduct routine cleaning, following the care instructions provided to keep it looking new.
Finally, take once more the opportunity to enjoy your new space. Completing a flooring project brings satisfaction and allows you to witness your vision transform into reality. Ensuring that everything from the spacing to the trim is perfect can further define your home’s character.
Vinyl can provide a versatile and stylish alternative to traditional flooring options. Your attention to detail will certainly pay off, not only in the ease of installation but in the overall longevity and beauty of your flooring.
Tips for a Successful Installation
All successful DIY projects come down to meticulous planning and following a set of guidelines to ensure your efforts yield positive results. With vinyl flooring installation, there are some tips that can greatly enhance your experience and outcome. Adhering to the following suggestions will help you avoid common pitfalls and will guide you toward achieving a stunning, long-lasting floor.
- Ensure your subfloor is clean and dry.
- Use a quality underlayment if required.
- Pay careful attention to room conditions.
- Keep your vinyl planks arranged before cutting.
- Stay patient and take your time during assembly.
- Consult manufacturer instructions for unique product specifications.
Achieving Precise Measurements
Measurements are the cornerstone of any vinyl flooring installation. If your measurements are off, you may end up with cut pieces that don’t fit correctly, leading to gaps, uneven surfaces, or even wasted materials. It’s advisable to double-check all dimensions before you begin cutting or laying your vinyl planks. Use a quality tape measure and note all lengths at least twice to ensure accuracy. Additionally, be mindful of door frames, vents, and other potential obstacles that may require adjustments to your cut lines.
Another critical aspect of achieving precise measurements is to consider the layout of your floor. Determine whether you want to install the planks parallel to a wall or follow the longest line in the room, as this can greatly impact the overall appearance of the finished product. You may also want to create a chalk line as a guideline; this will keep you aligned as you lay the planks. Taking the time to carefully plan your layout will save you from headaches later on.
Lastly, don’t neglect the importance of accurate measurements between planks. Ensure that you maintain a consistent expansion gap around the perimeter of your room; this will allow for any natural expansion or contraction of the materials. If the gaps are inconsistent or too small, it may lead to buckling or warping over time. Addressing these measurement details will lead to a more professional-looking and durable flooring installation.
Acclimating Your Vinyl
Even if you’re excited to start your flooring project, one of the key steps often overlooked is the acclimation of your vinyl flooring. Acclimating involves allowing your planks to adjust to the room’s temperature and humidity levels before installation. This practice prevents potential issues with shrinking or expanding once the flooring is laid. Ideally, you should leave the unopened boxes of vinyl planks in the installation area for at least 48 hours before you start working.
By allowing your vinyl to acclimate, you create the best environment for your flooring to perform optimally. If you skip this step and proceed with installation in a room that’s too humid or too cold, you might find that your planks warp or buckle shortly after being laid. It’s particularly important in climates with extreme temperature variations, so make sure you consider how your local weather might impact your flooring before rushing into the project.
In addition to temperature, humidity is another factor to keep in mind when acclimating your vinyl. If you’re installing the flooring in a basement or a room prone to dampness, utilize a hygrometer to measure humidity levels. Vinyl flooring performs best when installed at relative humidity levels between 30% and 50%. This small detail can make a significant difference in the longevity and appearance of your floor.
To ensure the most favorable conditions for your vinyl, it’s wise to check the manufacturer’s recommendations regarding acclimation. Your investment in time will pay off by preventing future headaches caused by improperly adjusted flooring.
Common Mistakes to Avoid
An informed DIYer is less likely to make the common mistakes that can sabotage their vinyl flooring installation. One major mistake is failing to properly prepare your subfloor. An uneven surface can lead to installation woes, so it’s crucial to clean, patch, and level the subfloor as necessary. Inspect it for any debris, moisture, or imperfections that might affect the vinyl’s performance. Skipping this step can lead to premature wear, cracking, or other undesirable results.
Another oversight occurs when you choose the wrong adhesive or installation method. Different types of vinyl flooring require different approaches; for example, sheet vinyl often requires a specific type of adhesive, while planks may utilize a click-lock system. Make sure you read the manufacturer’s instructions carefully to ensure you’ve selected the appropriate installation method and materials. Getting this right will greatly affect the stability and durability of your flooring.
Lastly, one common mistake is ignoring expansion gaps. While you may be eager to get things perfectly tight, failing to leave sufficient space at walls or transitions can lead to issues later. If your planks do expand, they may lift or buckle without the necessary allowance. Always refer to your flooring’s specifications for the required gap size and maintain this consistently throughout the installation process.
Tips to avoid common installation mistakes also include familiarizing yourself with your flooring options and their installation guidelines. This knowledge helps empower you to make the right choices for your project.
Any successful installation requires diligent attention to detail and a commitment to following best practices. By implementing these tips and being proactive about potential issues, you ensure that your vinyl flooring will not only look great but hold up against the test of time.

Pros and Cons of Vinyl Flooring
After considering various flooring options, you may want to understand the pros and cons of vinyl flooring to ensure it aligns with your needs and preferences when planning your DIY installation. Below is a breakdown of the benefits and drawbacks, which will help you make an informed decision.
Pros and Cons of Vinyl Flooring
| Pros | Cons |
|---|---|
| Water-resistant | Can be damaged by heavy impacts |
| Easy installation | Can fade under direct sunlight |
| Budget-friendly | Not biodegradable |
| Variety of styles and colors | May feel less luxurious than other materials |
| Comfort underfoot | Limited refinishing options |
Advantages
Any time you decide to update your flooring, understanding the advantages of vinyl can help reassure you that you are making a wise choice. One of the most significant benefits of vinyl flooring is its water resistance. This characteristic makes it an ideal option for areas prone to moisture, such as kitchens and bathrooms. You won’t have to worry about accidental spills leading to permanent damage, as vinyl can withstand occasional wetness without warping or buckling. This property not only enhances the longevity of the flooring but also alleviates concerns about mold and mildew, allowing you to maintain a healthier home environment.
Another considerable advantage is the ease of installation when compared to other flooring materials. This ease means you can tackle a DIY project without needing professional help. Many vinyl products come in tiles or planks that snap together or are self-adhesive, significantly simplifying the process. You can achieve a polished look in just a weekend, allowing you to enjoy your new floors sooner rather than later. Additionally, vinyl flooring often provides underfoot comfort; its cushioning can make standing for extended periods more bearable.
Finally, the variety of styles and colors available in vinyl flooring is highly appealing. You can find options that emulate the appearance of hardwood, stone, or tile without the associated costs. This variety means you can customize your home’s aesthetic while staying within budget, which is often a significant advantage for homeowners or renters looking to upgrade their space. The ability to select from numerous designs allows you to create the look you’ve always envisioned, enhancing your home’s overall ambiance.
Disadvantages
For every benefit, there are some disadvantages to consider when choosing vinyl flooring. One potential drawback is its susceptibility to heavy impacts. While vinyl is sturdy, it’s not impervious—dropping heavy furniture or tools can leave dents or scratches on the surface. This durability issue can be a concern if you live in a busy household or regularly move items around. You want to ensure that your lifestyle complements the flooring’s limitations, ensuring you can enjoy it without incurring damage.
Another notable downside is the fading potential of vinyl flooring when exposed to direct sunlight. Over time, UV rays can lead to discolored patches, diminishing the aesthetic appearance of your floors. If you have large windows or an area with considerable sun exposure, consider placing rugs or curtains to minimize fading. While vinyl can be a great flooring solution, you should weigh the implications of your home’s layout and exposure before deciding.
Cons of vinyl flooring don’t stop there; it is worth noting that vinyl is typically not biodegradable. If you are environmentally conscious, this aspect might weigh heavily on your consideration since end-of-life disposal could be less favorable than more sustainable alternatives. Additionally, while vinyl flooring offers countless design options, it may not possess the same industrial charm or luxury feel that authentic materials like wood or stone provide. Therefore, weigh these disadvantages against your style preferences and personal values before moving forward with vinyl flooring installation.
Conclusion
Taking this into account, successfully completing a DIY installation of vinyl flooring can be a rewarding experience that not only enhances your home’s aesthetic appeal but also saves you money in labor costs. As you’ve learned throughout this guide, the process involves several steps, from preparing your subfloor and gathering the necessary tools to laying out the planks and applying finishing touches. By following each detailed step with care, you can ensure that the installation is done efficiently and effectively. This approach will help you achieve a professional-looking finish that you can be proud of, demonstrating the value of your time and effort.
Your attention to detail during the installation process will pay off, providing you with a durable and stylish flooring solution that stands the test of time. Throughout the guide, you’ve been equipped with knowledge about various types of vinyl flooring, adhesive methods, and techniques that contribute to a long-lasting installation. Each decision you make—from the selection of materials to the application of the flooring—will contribute to the overall success. By remaining patient and methodical, you can navigate challenges with confidence, knowing that you are capable of transforming your space into something truly unique.
Ultimately, this DIY project not only enhances your living space but also empowers you with newfound skills in home improvement and interior design. By undertaking the installation of vinyl flooring yourself, you open the door to future home projects, cultivating a greater appreciation for your surroundings. With every step of the process, you develop an understanding of the materials you work with and how they contribute to your home’s character. As you walk across your newly installed vinyl flooring, you can take pride in knowing that you transformed your vision into a tangible reality, shaping your environment to reflect your personal style.